Monday, April 27, 2020

Frozen

Happy Birthday!! A "Frozen" shaker card.
Today's post is a real short one. I just wanted to share a birthday card I made for an eleven year old American girl who is a big fan of Disney´s Frozen. I don't know the girl in question, but a woman in one of the card-making groups I belong to on FB asked if anyone would consider making a birthday card for her daughter, who will be 11 in the beginning of May. I think quite a few said they would make a card and send to her.
I actually spent an insane amount of time making this card. I don't own anything card making wise that has to do with Frozen, so I had to go online and find a coloring picture to download and print out. Then I had to color and fussy cut it, before coming up with a type of card to put the picture on. I had initially planned to make a rocker card and had made a rocker card base(Rocker Kite Card), however, the image didn't fit very well on it, therefore I changed my plan, and made it into a shaker card instead.
I hope she will like it!!😃


Storage Boxes

Storage Box for 6"x6" Paper Pads
For the longest time I have stored my 6"x6" paper pads in a plastic container that is a little too small. The other day I did a storage project with drawers using foam board, that I haven't shared yet, due to the fact that I am waiting for the handles to finish off the drawers. Anyway, I loved working with foam board, and it gave me the idea to use it for a pretty sturdy paper storage box. It certainly has it's flaws, however, it serves its purpose, so all in all I am very happy with it!!

The side view of my storage box.
The box is made to fit the shelf I wanted to keep it on, and it measures about 12"(length)x6 1/4"(width)x 4 3/4" or 5"(height) if the bottom is included.
I have "dressed" the box with the beautiful paper Loveland from Scrap Boys. (note to self: have to get more of this paper😍) scrapboys.com

Seen from above.
It holds quite a few paper pads, and all I need to do now, is to make dividers for it. But that is a project for another day😁!!


Saturday, April 25, 2020

FaceBook Craft Alongs

Paper Pixie´s Stamping Up Ink Pad Gift Box
&
Mixed Up Crafts Milk Carton
Today I am sharing two projects that I have made as a matching set. First I have made a small gift box based on the Paper Pixie´s Stamping Up Ink Pad Gift Box (paperpixie.com), the she shared in this weeks live FB tutorial. I don't have any Stamping Up stuff, as this is a group for people from certain countries which offer Stamping Up products. And yes, I know you can buy Stamping Up goods on eBay, but I have not found it worth the money. I did, however, love this little box, and I figured I could use it for something else, so I gave it a go. As with the project I shared a little while ago, the Perfume Box with matching Card, I have used Docrafts Papermania Capsule "Moroccan Blue" 12"x12" Paper Pack, as well as Lawn Fawn´s lawn fawndamentals cardstock "rainforest" for both projects. 
The second project is my prototype from a FB craft along with Sam Calcott form Mixed Up Craft (mixedupcraft.com). I have shared a milk carton from this craft along before: Mixed Up Crafts Milk Carton Gift Box, on which I did ink blending, ink stamping and masking. The prototype type has just been sitting on my desk for quite some time, and it was only yesterday when I finished the Paper Pixie box, also made with the rainforest card stock, that I decided to decorate the milk carton with the same Moroccan Blue papers.

"Stamping Up Ink Pad Gift Box"
paperpixie.com

The box closes with a small magnet.


Opened
The backside of the gift box.

 My second project: Mixed Up Crafts Milk Carton. (mixedupcraft.com 8.April 2020.)

Milk Carton à la Mixed Up Craft.


The Milk Carton is closed with small magnet,
before a ribbon is added for decoration.
Take care and thanks for stopping by!!💜


Products used:
lawn fawndamentals cardstock "rainforest" lawnfawn.com
Docraft´s Papermania Capsule "Moroccan Blue" kreativscrapping.no
Ribbon, white - Søstrene Grene
Stamp "♥til deg" - scrapmagasinet.no
Ink, lawn fawndamentals premium dye ink pad "blue jay" lawnfawn.com
Adhesive, Rangers Multi Media Matte - rangerink.com

Tuesday, April 21, 2020

Rocker Kite Card

Kite Rocker Card


The other day I shared a Kite Card (Kite Cards), and today I wanted to show what I did to finish the largest of the kites, the gift card kite. The other day I watched another FB Live with Sam Calcott from Mixed Up Craft (mixedupcraft.com), on Rocker Cards. I had plans to make a birthday Rocker Card, but abandoned the idea when the birthday cards focal-element didn't fit onto the rocker card base, so I put it aside. After I had finished the birthday card, I happened to see my kite laying next to the rocker card base, and I saw that they were a perfect match. So I decided to kill two flies in one swat (or two birds with one stone😜, if you prefer the English version rather than the Norwegian), and put them together to one card, a Rocker Kite Card.😉 It was a bit difficult to get the rocker in balance, and I kept adding to the right hand side of the card, and I almost managed in the end.


The unfinished kite on its own.
Open, with a gift-card.


Tutorials for the Kite Fold Card and the Rocker Card:


Sunday, April 19, 2020

Kite Cards


You're So Fly, Kite Card
I am constantly trying to evolve as a card maker, and the only way to do that is to try out new styles and card making methods. Card making is so more than just gluing something onto a card base. Luckily, I guess I should say, as it would be extremely boring if that was what all the brilliant card makers out there did. 
Today's card is called a Kite Card, for the simple reason that it has a small paper kite as a focal point. I first saw this card on a Facebook live that Sam Calcott from Mixed Up Craft (mixedupcraft.com) did a few days ago. It is not a new card style that she invented, it has existed for quite some time and there are many good examples and tutorials for it, out there. However, when Sam gets an idea for a card, she always makes it her own by putting her own spin on it. I however, am a copy cat, I admit that - but that is the way I learn to make all these different cards. This one turned out to be a real struggle for me, though. The kite itself is not hard, what gave me problems were the mats and layers. It looks really simple, but somehow I either managed to get them too small, or too big, or I didn't get the right angle so it fit the angle of the kite. I must say I have been relived to see that many of the other members of the Facebook group "Mixed Up Crafters (MUCs)", although not everyone, have had the same problem that I have had. However, there have been SOOO many beautiful versions of the card among the MUC members that I didn't want to admit defeat and give up. Therefore, I kept going until I got it right as well, or at least until I got results that were acceptable to me. 

Here is Sam's youtube tutorial for the card:


Inside my kite card
I have only made one kite into a card so far, I do, however, have more kites that are ready to be made into finished cards.


This kite is quite a bit bigger than the other kites. It is meant to hold a gift card. It can also be stuck down on a card, it just has to be a bit bigger than the cards required for the other kites.
Larger Kite holding a gift card.


Two more kites that are ready to make into cards:


I will post the other kite cards I make when I finish them.


Thursday, April 16, 2020

A variety of cards using hearts as the focal point.

"You Have My Heart" - heart made with the herringbone technique.
 The first card in my post today is made using a technique called the herringbone technique. It is a great technique to use if you want to use up some of all the paper-scraps you get when making cards.
I have chosen to use papers from Lawn Fawn´s Really Rainbow series (lawnfawn.com), placed the scrap stripes down on double sided adhesive with gaps between them. Then I filled in the gaps with pink glitter and tied a pink ribbon around the heart, before adhering it to some glitter card stock with foam tape. I found the sentiment "You have my heart" to be a fitting sentiment.
There are many tutorials on the herringbone technique out there. Here are a few:

I got the idea of using glitter when using the herringbone technique from Sam Calcott from Mixed Up Craft (mixedupcraft.com

Watch her do it in this tutorial:

"Fluttering By to say Hi....", another card using the herringbone technique.

In the next two cards I have die-cut out several hearts and divided them up, thinking I would put them together again changing up the different heart pieces. The idea for this type of card comes from a different card maker on youtube, Natasha Foote. I thought, however, that the hearts looked the best when I didn't mix them up - so I glued them back together without mixing them up. Again the papers are from Lawn Fawn´s Really Rainbow series (lawnfawn.com)
"You Have My Heart 1" 
My first card is made by putting a heart back together on a blue metallic background. The papers used for the hearts on both cards are from lawnfawn.com - you guessed it😉, the Really Rainbow Series. Both cards have gotten an added ribbon and the "You have my Heart" sentiment.
"You have my Heart 2"

Here is Natasha´s youtube tutorial for making this type of card:

Last but not least I have included a card I have shared on my blog before, Another Pop Out Swing Card.
Pop Out and Swing Card - "Friends Forever" 


Monday, April 13, 2020

Perfume Box with matching Card


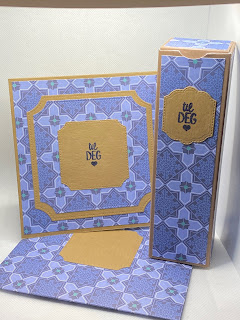
Til Deg 💙, Perfume Box with matching Card - Moroccan Blue
Today's post is a matching box and card set. Initially I was just going to make a box that was big enough to hold something like a perfume or a cream, however, when I had decorated the box, I liked the paper so much that I felt like making a matching card using the same paper. The paper is from Docrafts Papermania Capsule series called Moroccan Blue which I got with masculine cards in mind.
The box, yet another project from mixedupcraft.com - https://youtu.be/NCaGUciiu20 - is intended as a perfume gift box. It measures 5cm(wide) x ca.17,5cm(high) x 5cm(deep) or 2" x 7" x 2", and it can hold a variety of things, not only perfume. 

Til Deg💙, Moroccan Blue Card
The card was supposed to be on a white 6" x 6" card base, but as I was building on the card front, I decided to keep it brown like the base of the box. Therefore, I ended up using the card front as the front of my top folding card base, creating a hinged back piece, which I simply glued onto the card front, leaving me with a 5 3/4" card. To finish the card off, I decided to make a matching envelope using the same Moroccan Blue Paper.


The Perfume Box with example content

The Perfume Box with example content
Watch Sam Calcott´s tutorial here:


Tuesday, April 7, 2020

Mixed Up Crafts Milk Carton Gift Box


Milk Carton Gift Box, - Seahorse -
Today's project, another Mixed Up Craft project (mixedupcraft.com), was a fun but quite time consuming one. The milk carton itself is very quick to make, the style of decorating, however, took me a long time.
Front and right side of the Milk Carton.
Left hand side and front of the Milk Carton.
Back of the Milk Carton

Back and right hand side of the Milk Carton
 The process with pictures. 

1. You will need a piece of card stock measuring 8 1/4"x11".
On the 8 1/4" side score at 2 1/4", 6 1/4" and at 7 3/4"
On the 11" side score at 2 1/4", 5 1/4", 7 1/2" and at 10 1/2"
DO NOT BURNISH THE SCORE LINES YET!!

2. Choose the motif you want to have on your carton, and stamp it on the card stock. Use a stamping platform if you are uncertain if you will be able to get a clear and crisp result in one go.

The flat milk carton scored and stamped.
Close-up of the masked images.

The stamped images with the masking pieces adhered over them.


3. Since I have chosen to ink blend my background I am going to need to mask the stamping that I have done. Stamp the same images on low tack adhesive paper, like masking paper or post-it paper.


4. Then fussy cut the stamped images and adhere them over the original stamped images on the carton.
Original stamped image shown next to masking.

5. Start to ink-blend over the masked images. Use a light hand, but make sure to get ink into all the little nooks and crannies!
Inking up the carton with a mix of the Tim Holtz Distress Oxide Inks (rangerink.com), Mermaid Lagoon and Salty Ocean.

6. When you are happy with your ink-blending, you can remove the masking from the stamped images to reveal perfectly crisp and white images ready for you to color!
Masked and ink blended!
7. Color

8. Look at the template below and cut away the grey areas. This means that you need to cut the bottom vertical shorelines up to the first horizontal score lines. Wedge the smaller "tabs". These will be folded in together with the larger tabs to form the bottom of the carton.
Solid lines are score lines, cut away colored-in grey areas, fold in along stippled lines to create the top of the milk carton.
9. Put glue along the long skinny side tab, and fold the carton in at the next score line in (the second score line fro the right), fold the other side of the carton over (at the second score line from the left) to meet and glue the two edges together. 

10. Cut two small hole at the top of the milk carton, put some ribbon through the holes and tie a bow to hold the top of the lid together.  

11. Fill the box with whatever you you want to give away!!
The box measures 3"x4"x2 1/4" (ca. 7,7cm x10,2cm x 5,5cm)

Enjoy!!😁


Impossible Boxes

Impossible Horace😂 Meet Horace the Horse!😍 Sam Calcott from Mixed Up Craft, www.mixedupcraft.com , recently released her own collect...